If you're going to develop iOS or OS X applications, you're going to be using Xcode, Apple's integrated development environment (IDE). The blog post is an extremely simple introduction to Xcode. It's so simple that I'm only going to discuss one command in the IDE: the "Run" application button.
Before starting to program on a computer, I create a folder (directory) for my programming projects. I call the folder "Programming" to keep the contents obvious. You can name your programming projects folder anything, but be sure you can locate it easily.
I like to keep programming projects outside my "Documents" folder, at the top level of my personal user folder. Most of the folders within the home directory for a user are created by the operating system. For example, Apple's OS X creates the following: Desktop, Documents, Library (usually hidden), Movies, Music, Pictures, and Public. The home folder for most users won't have as many folders as I have, which is two dozen. It is common to have about a dozen folders.
I also drag the folder to my "Sidebar" to create a shortcut to my projects. My sidebar is a bit cluttered, but I love the one-click convenience when I am working on many projects. If you don't see a sidebar, you can show or hide the sidebar using Finder's "View" menu. Because I like to know where I am when navigating the computer, I also show the "Path Bar" and "Status Bar" at all times.
Screenshot: My user folder

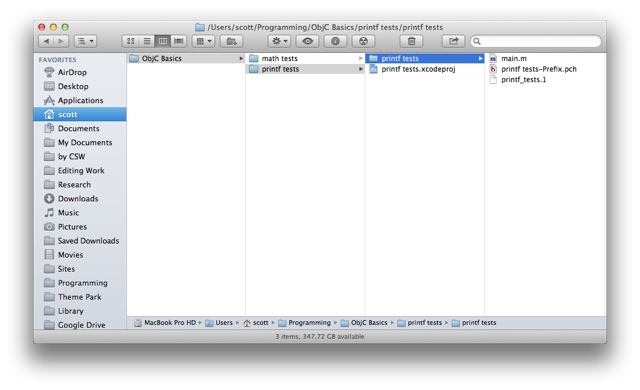
I've started with an empty "Programming" folder for this example. Create your "Programming" folder, and then create an "Objective-C" or "Cocoa App" folder within your programming projects folder. Normally, my programming folder has sub-folders for several languages and tools. I've created an "ObjC Basics" folder within "Programming" to organize tutorial files during my Cocoa immersion course.
My programming folder, with an Objective-C sub-folder and Xcode projects testing Objective-C lessons:
Before starting to program on a computer, I create a folder (directory) for my programming projects. I call the folder "Programming" to keep the contents obvious. You can name your programming projects folder anything, but be sure you can locate it easily.
I like to keep programming projects outside my "Documents" folder, at the top level of my personal user folder. Most of the folders within the home directory for a user are created by the operating system. For example, Apple's OS X creates the following: Desktop, Documents, Library (usually hidden), Movies, Music, Pictures, and Public. The home folder for most users won't have as many folders as I have, which is two dozen. It is common to have about a dozen folders.
I also drag the folder to my "Sidebar" to create a shortcut to my projects. My sidebar is a bit cluttered, but I love the one-click convenience when I am working on many projects. If you don't see a sidebar, you can show or hide the sidebar using Finder's "View" menu. Because I like to know where I am when navigating the computer, I also show the "Path Bar" and "Status Bar" at all times.
Screenshot: My user folder

I've started with an empty "Programming" folder for this example. Create your "Programming" folder, and then create an "Objective-C" or "Cocoa App" folder within your programming projects folder. Normally, my programming folder has sub-folders for several languages and tools. I've created an "ObjC Basics" folder within "Programming" to organize tutorial files during my Cocoa immersion course.
My programming folder, with an Objective-C sub-folder and Xcode projects testing Objective-C lessons:
I'm going to assume you know how to locate Xcode within the "Applications" folder on a Macintosh. Locate the Xcode icon and start the application.
You should see the "Welcome to Xcode" splash screen when you start the IDE. The splash screen indicates the version of Xcode running and includes a handy list of recent projects.
Note: You won't see it if you have already started Xcode in the past and unchecked "Show this window when Xcode launches." Also, we aren't going to explore the options listed on the splash screen in this introduction, but I encourage you to try the "Learn about using Xcode" link.
Screenshot: Welcome to Xcode splash screen

Select "Create a new Xcode project" from the welcome splash screen. You can also use "File, New, Project" menu path (or shift+command+N). After telling Xcode you want to create a new project, you will be asked to select the type of project. Each type of project comes with a simple template to help you get started.
For this tutorial, select "Application" under "OS X" on the lefthand panel of the window. Then, select "Command Line Tool" as the type of application.
Screenshot: Selecting a project template

After you select a project template, click "Next." Xcode then presents a list of options for the project. The first of these options is the application's name. In Apple's universe, applications are called "Products." I'll resist a lengthy complaint about the rhetorical implications of "Product Name" instead of "Application Name" in Xcode.
You can name your application (product) "Hello World" for this tutorial. You then need to include an "Organization Name" and unique "Company Identifier" for the application. These are important, especially later on when you are creating "real" applications. The company identifier should be one word that will help the operating system identify programs by you and your organization. The identifier is used to help store application settings and more. For now, maybe use your last name or initials. In my example, I'm using the name of my own freelance business as the organization name and identifier.
Selecting the "Type" of application is simple: stick to "Foundation" unless you know you need to select something else. The "Foundation" type works fine for C and Objective-C programs. Also, you don't need to worry about the "Use Automatic Reference Counting" option at this time. Automatic reference counting (ARC) is important as you code complex applications, but way beyond what we'll be doing in the early tutorials.
Screenshot: Options for a new project

After you click "Next" on the options window, you will need to select a folder in which Xcode will store the application and any additional files needed. On my MacBook Pro, I navigate to my "ObjC Basic" folder and click "New Folder." I name the new folder "Hello World" and then Xcode automatically creates a bunch of files and folders within the new home for this project.
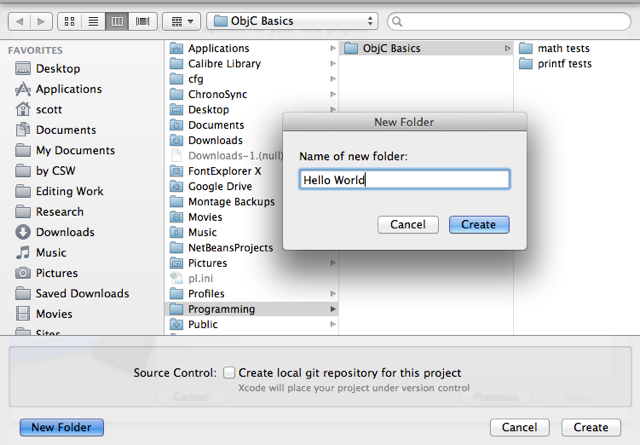
Screenshot: Hello World folder created

Xcode appears!
It's okay to feel overwhelmed. Xcode is complex. Apple might focus intensely on the user experience when they develop software, but they don't seem concerned with the developer experience. Thankfully, we're going to ease into Xcode. Even experienced developers can find the Xcode IDE overwhelming.
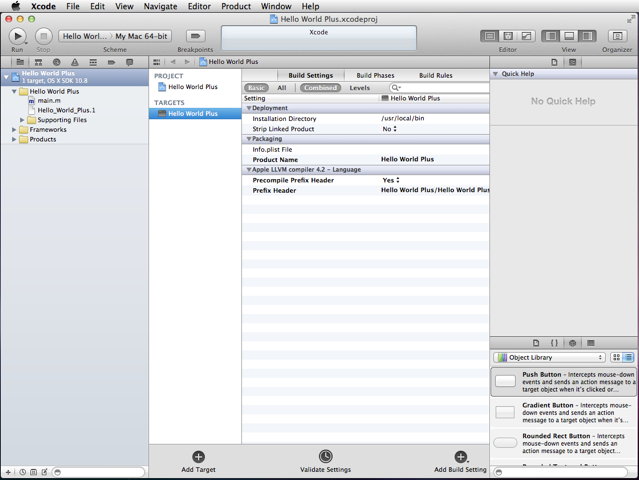
The lefthand pane of Xcode is the "Navigation Area." If you click the folder icon above the navigation area, you will see a map of the files and folders contained within a project. You will use the navigation area constantly, moving from file to file while you edit an application.
The righthand pane of Xcode is the "Utility Area." This area includes code snippets, a tool pallet, and a quick help area.
The middle of the Xcode workspace is the aptly named "Editor Area." This is where you will edit code and project settings.
At the bottom, below the editor area, is a "Debug Area" that displays program output and error messages. The debug window is hidden until you run an application.
Apple's diagram of the Xcode workspace:

Assuming you are following along with this tutorial, you should have a "Hello World" project template loaded. In the navigation area, select the "main.m" file. Clicking this file opens the sample Objective-C code in the editing area. Study the navigation area closely. Each project has a main folder that has the name of your application. That folder will contain most of your code when we work through tutorial projects. Much later in your Objective-C experience, you will reuse code across several projects — that's when you'll need to navigate through dozens of folders with lots of files.
For now, find and open the "main.m" file so you can study the sample code.
Screenshot: Opening main.m in the editor

Every C-based programming language requires a "main()" function. The first code file is "main.m" in the project template, so you can easily locate the required main() function. Basically, main() tells the computer, "This program starts here!" When the end of main() is reached, the program stops.
Note: Experienced computer users and programmers know that file extensions indicate document types. An "m" file contains Objective-C code. Why "m" and not "oc" or something else? I'm sure there's a reason. The "c" extension is for C program code, and "cc" is for C++ program code. You might see some C or C++ files within a project.
In the upper-left corner of Xcode is a "Run" button. Click it to run the "Hello World" sample program. The output from the application appears in the debug area at the bottom of Xcode.
Screenshot: Hello World has finished

You now know how to create a project, navigate the project files, and execute the project.
C Project Template
If you select the "C" project type within the options window, the project template and sample code will be "pure" C code. That's not a problem for learning C, but since Objective-C is a superset of C, there's no reason not to stick to the "Foundation" type for tutorial lessons.There are some minor differences between the C template and Objective-C template. Compare the two and you'll notice the little things that are different. Hint: compare the #include and #import directives — something I'll explain in the next post.
Screenshot: C project template

You can run a C program the same way you run an Objective-C program from within Xcode. Again, the output appears in the debug area.

Now, you can run C programs in Xcode, too.
Sample Application
The screenshot below is from our next lesson: a simple program that prints output. I have clicked "Run" and the output of the print functions appears in the debug area.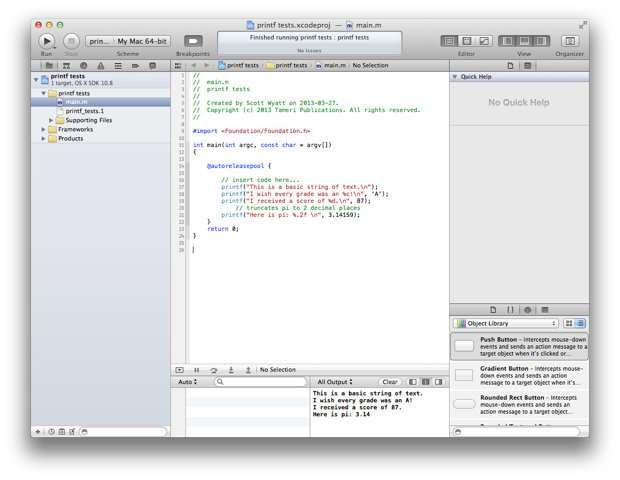
In my next post on Cocoa programming, we'll examine a sample project to review some basic C programing skills essential to learning Objective-C.
Comments
Post a Comment